 Note: Translated with www.DeepL.com/Translator (free version)
Introduction
Xserve is Apple's long-discontinued line of servers, powered by the Mac OS X Server operating system. After Xserve was discontinued, OS X Server slowly became just an app. In 2019 Apple introduced a new rackmount Mac Pro, which can also be used as a rackmount server. But the price is not something I can justify spending for fun. The other thing is that with ARM Mac releases coming soon, the x86-64 based Mac Pro will be obsolete in few years. It may not make sense to spend a lot of money on a Mac Pro at this point in time. On the other hand, the old Xserve is already very cheap, with similar performance and price to the contemporaneous Dell PowerEdge R610. Unlike the 2009 Mac Pro, which for some reason still costs a lot now. For this reason as a Mac homelab or for desktop use, the last generation Xserve can be considered a good choice. The following are the main specs of the last Xserve.
Xserve 3,1 (Xserve 2009)
- CPU: 2x Intel Xeon E/X/W5500 series
- RAM: 12x DDR3 REG ECC (Up to 192GB)
- HDD: 3x SAS/SATA
- GFX: nVIDIA GeForce GT120 (MXM-A upgradable)
Xserve in 2020
Here are some concerns when using Xserve in home settings:
As a server
- Too few hard drive bays and SATA hard drive capacity limited to 1TB
As a workstation
- The performance of the 5500 series of processors is seriously outdated
- Severe fan noise
- Weak GPU
Common issues
- No longer supports the latest macOS, if you need to use macOS
This article is about fan noise only.
Fan noise
As with most 1U servers, the Xserve's fan noise is noticeable: there are 14 small fans inside the Xserve, and the default speed settings range from 6,000 RPM to 18,000 RPM. Half a meter away from the server at the lowest speed setting, the noise level is approximately 52dB. This is not excessive and is not particularly noisy in a server. But it's still an annoying level to keep in one's home, especially if it's in the bedroom.
Fan mod options
Here are some options for modifying Xserve's fans, including the advantages and disadvantages I can foresee.
Put resistors in series in the fan supply or reduce the fan supply voltage
Pros:
Simple to implement
Cons
Xserve's SMC detects an abnormal fan speed and sets all fans to run at full speed. If deceleration is required in this way, the maximum speed of all fans must be reduced below 6,000 RPM to achieve reasonable noise level. But then the overall cooling capacity will not be able to cope with the heat generated under high load conditions.
Hijack the PWM speed control line and revolution feedback line of the fan
Pros:
Kind of straight forward to implement. Would work on all kinds of 3/4 pin fans.
Cons:
The Xserve's SMC can still detect fan speed anomalies and run all the fans at full speed. There are 14 fans inside the Xserve, all using proprietary interfaces. It is kind to tedious to cut and rewire all 14 fans with custom made hijack board. It is not clear if there is an existing solution, or you may need to design your own board.
Add a MCU in between the SMC and fan controller chip to do a MITM attack
Pros:
Only several wires for I2C connection is required. The SMC will not detect abnormal rotation speed. Ordinary microcontroller development board can be used. It can self-adapt the speed, drop low noise at low load, and ensure heat dissipation at high load.
Cons:
MCU firmaware development may be cumbersome. The final solution is only applicable to Xserve and is not generalizable.
I will go with this solution.
Hardware Implementation
Microcontroller
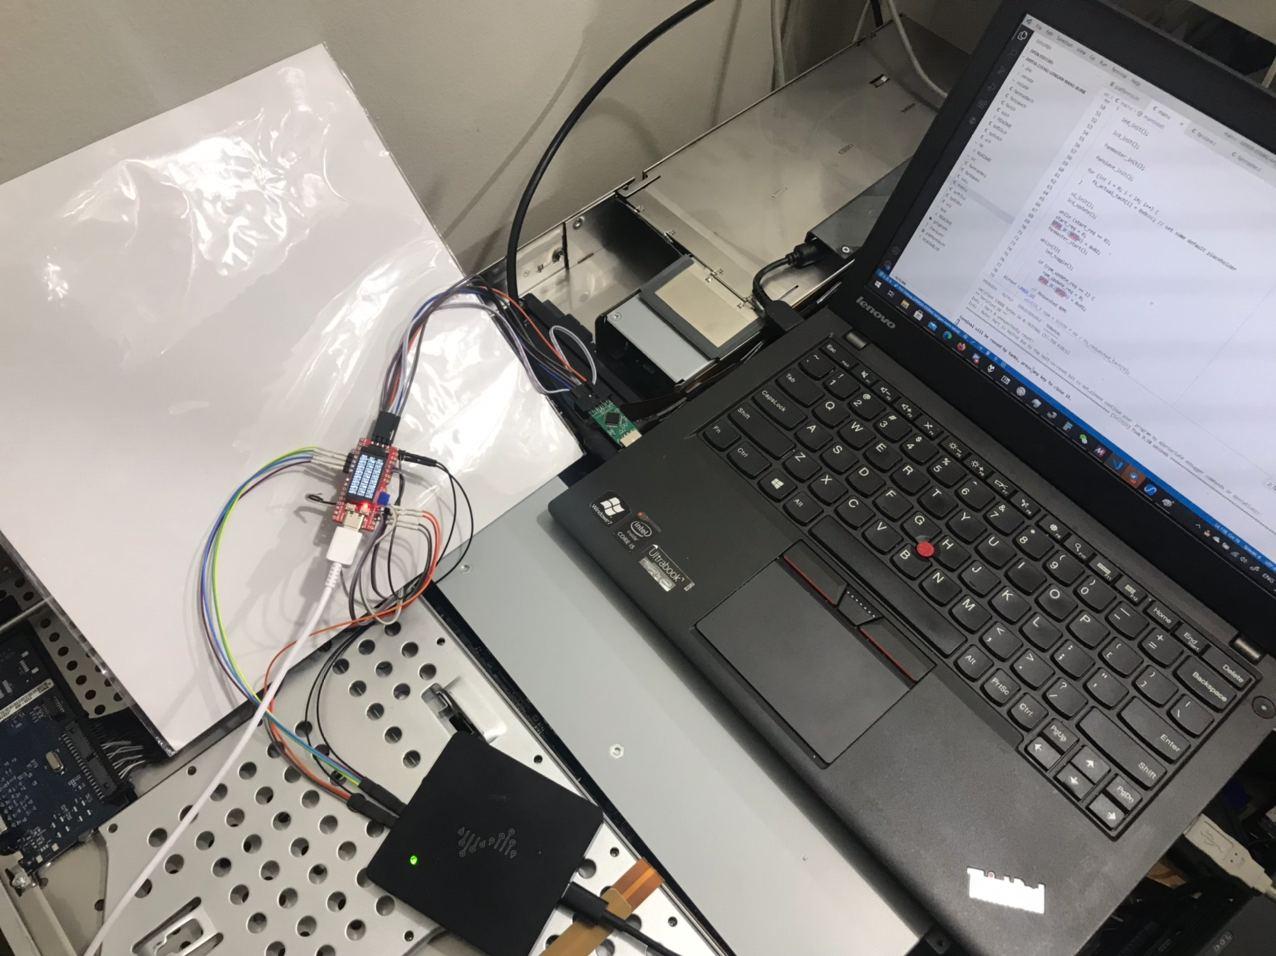
The hardware is straightforward using a cheap Longan Nano development board with a GD32VF103CB RISC-V microcontroller with a small 160x80 resolution IPS screen on board. The screen will be used to display RPM counts.
Xserve fan module
The Xserve's fan module to motherboard interface is a 12-pin connector with some pins defined as follows.
- SCL-B
- SCL-A
- SDA-B
- SDA-A
- GND
- VDD (5V)
Where A and B represent two different I2C/SMBus 1.x busses, respectively. The devices on the A bus are.
- 0x50: Fan controller 3, control fans 6-7
- 0x51: Fan controller 2, control fans 4-5
- 0x52: Fan controller 1, control fans 2-3
- 0x53: Fan Controller 0, Control Fan 0-1
Among the devices on the B-bus are.
- 0x2C: unknown, but not on fan module
- 0x2D: position, but not on the fan module
- 0x41: PCA9536, I2C bus GPIO, unspecified use
- 0x51: Fan controller 6, controlling fans 12-13
- 0x52: Fan controller 5, controlling fans 10-11
- 0x53: Fan controller 4, control fans 8-9
To perform a man-in-the-middle attack, you need to start with the two I2C buses and intercept the messages of the 0x50 - 0x53 devices.
Hardware connections
Connect the I2C of the motherboard and the I2C of the fan module to the microcontroller board respectively.
My connections here are.
- PB6 - Fan module SCL-A
- PB7 - Fan module SDA-A
- PB10 - Fan module SCL-B
- PB11 - Fan module SDA-B
- PA12 - MB SCL-A
- PA13 - MB SDA-A
- PA14 - MB SCL-B
- PA15 - MB SDA-B
Software
I2C RX
For each I2C bus, the microcontroller needs to emulate 4 I2C devices, i.e., respond to 4 different addresses. However, the hardware I2C of GD32 can only respond to a maximum of two addresses. The GD32 has two I2C controllers, that is, in total it can only respond to a maximum of four addresses, this does not meet the requirements. So interrupt-driven software I2C is used.
I2C has a clock rate of 100kHz, the microcontroller runs at 100MHz. The microcontroller have a half-cycle time to prepare to respond, that is, each I2C clock edge microcontroller has about 500 clock cycles to respond. Considering that the MCU pipeline is shallow and there are no cache issues, IPC should be very predictable and should be able to meet the performance requirements.
To implement, maintain a state machine, enter different states according to the state of SCL and SDA, output different signals, and call upper-level device simulation functions to read or write data when needed. You can refer to the code.
I2C TX
Directly using the hardware I2C controller of GD32.
Fan controller simulation
The fan controller itself has a lot of features, but the BMC doesn't use any of these advanced features; the BMC just sets the fan controller to manual mode and then sets the RPM. the main job of the analog controller is to emulate the register read/write interface, including functions such as batch read/write, and there's not much else worth noting. Other than that there isn't much of note.
Overall Logic
The Xserve SMC reads and sets the speed of all fans once per second. The program code adjusts the speed upon receipt of all fan speeds and sends it to the fan controller. It then reads the speed of all fans, makes a reverse adjustment, and waits for the next SMC reading to be returned to the SMC.
UI
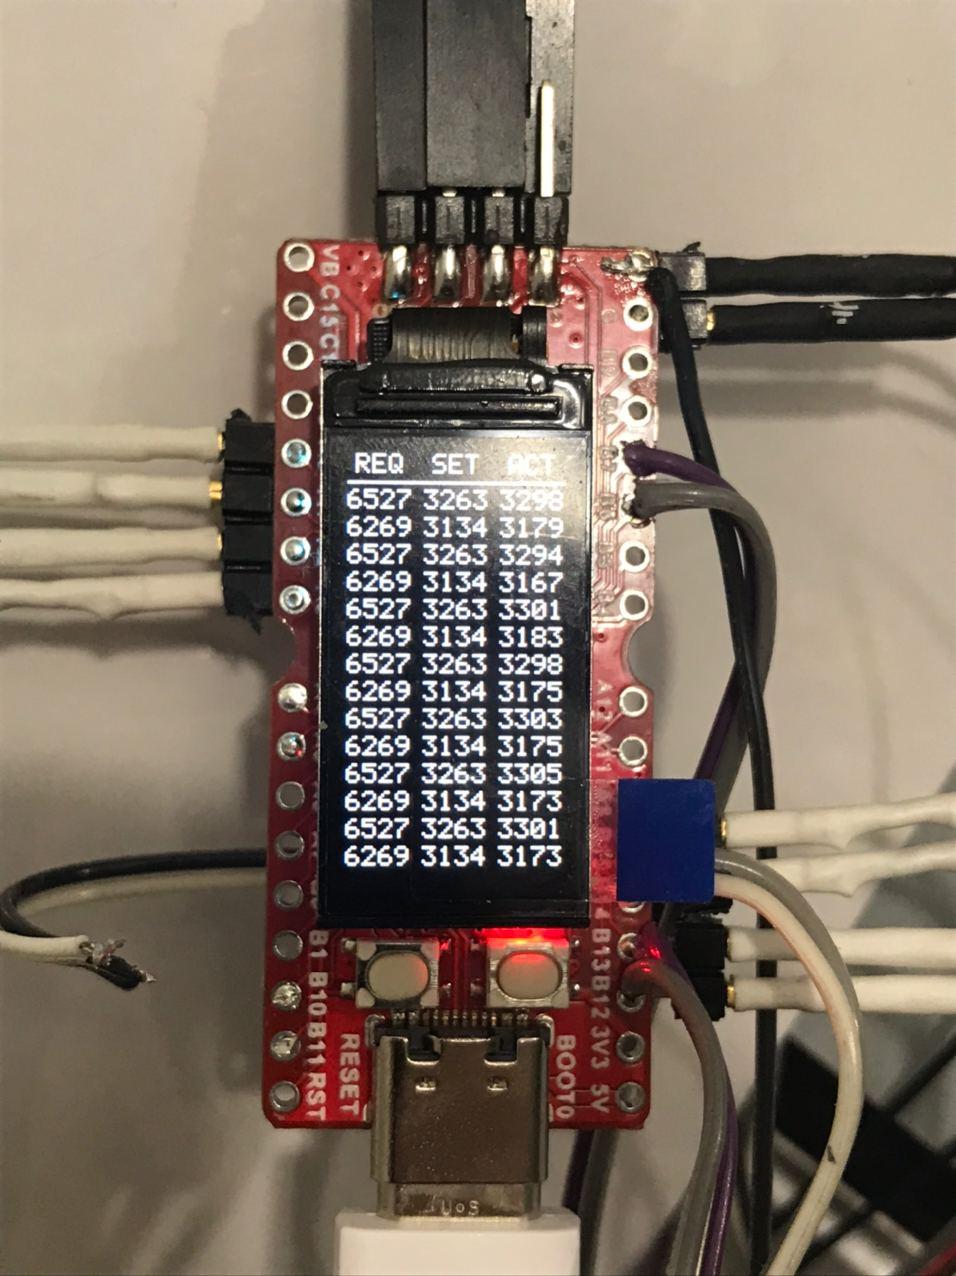
This is a very minor point indeed. Considering that the unit is housed in a case, the screen is invisible most of the time. The UI is relatively straightforward, with three columns of data, the speed requested by the SMC, the speed set by the fan, and the actual speed of the fan. There are 14 rows for each of the 14 fans.
Final Installation and Effects
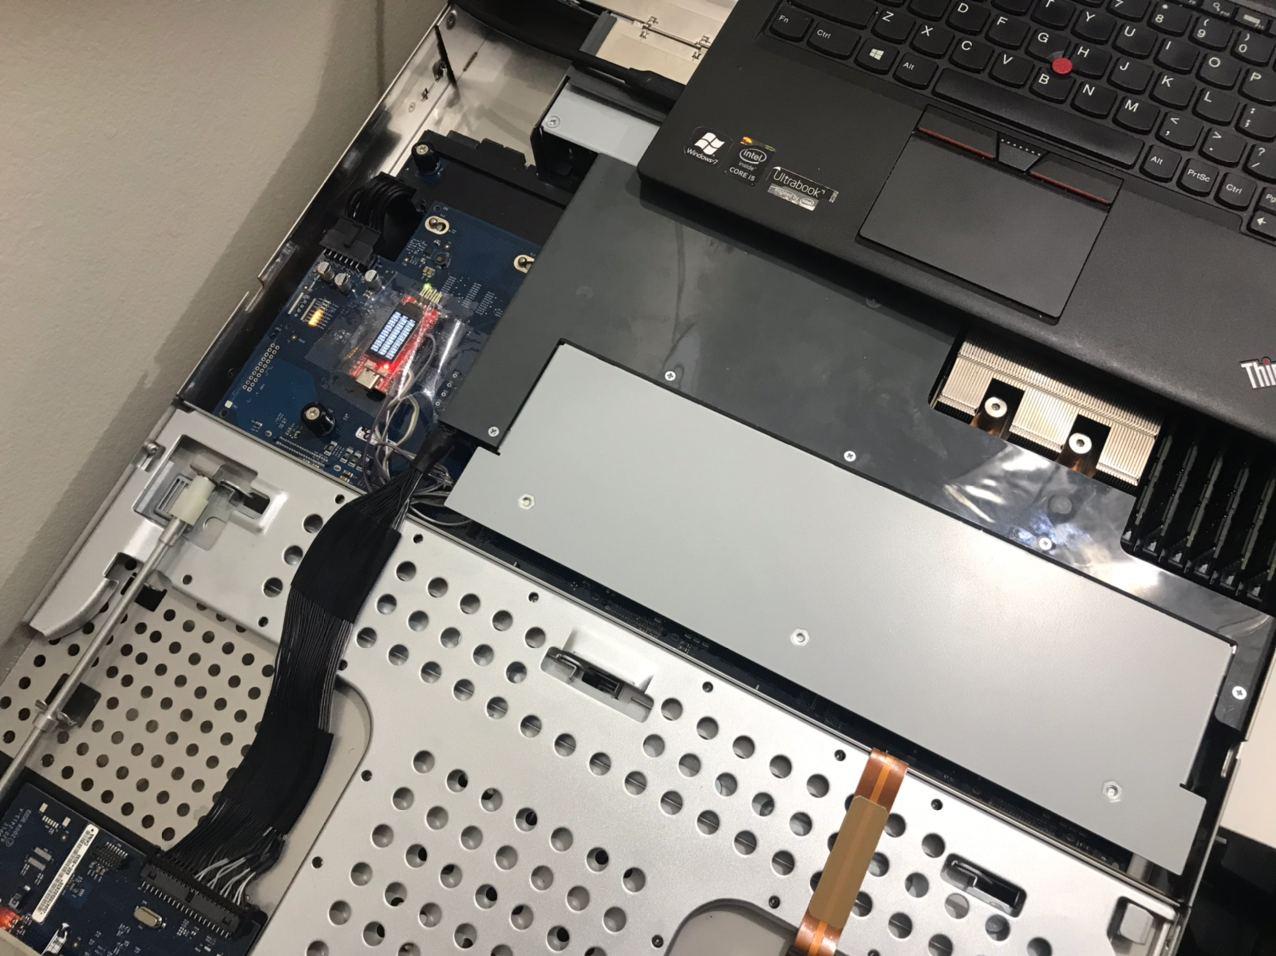
The installation was completed as shown. The noise level is 48dB after powering on in a room with an ambient noise level of about 36dB, noting that the main noise at this point comes from the small fan on the power supply, and this mod did not involve the power supply fan. This will be the next mod target if necessary.
Other modifications
After talking about fan modifications, here are other possible modifications as well.
Upgraded 5500 processor
The highest performing processor in the 5500 series is the W5590, 4C8T 3.33GHz. Xserve uses processors without IHS (metal top lid), but it is possible to install processors with IHS, or you can choose to delid the processor as well.
Upgrading the 5600 processor
The 5600 series processors use the same LGA1366 socket as the 5500 series, however Xserve's firmware does not support the 5600 series processors. Since the 5500 and 5600 are already processors with integrated memory controllers, simply updating the microcode is not enough to get the BIOS to support the new processors (at least it would need new MRC). Since I don't know anything about the more complex EFI firmware modifications, I can't do anything about that part. So far, the only viable way to get Xserve to support the 5600 series processors is to flash the MacPro5,1 firmware. Flashing the 5,1 firmware causes the following problems.
- 5500 series processors can no longer be supported
- Only 8 memory slots out of 12 is usable
- Server front panel LEDs are not operational (including CPU load and hard disk status)
- Failure to match the serial number and model number will result in the inability to use services such as iCloud (this can be resolved by injecting the model number using OpenCore)
- Cannot use SATA hard drive bays, only SAS (but you can use SATA hard drives in SAS bays)
Graphic card upgrade
Xserve supports the use of one MXM-A graphics card. I recommend upgrading to an MXM-A card like AMD Radeon Pro WX4150, AMD Radeon RX560, etc. for Metal support. Please refer to the iMac 2011 Graphics Upgrade post to flash the modified version of VBIOS to enable native display boot screen.